Monday, July 12, 2010

So. Much. Tile.

I'm not sure which of us thought that tiling the shower enclosure would be a "fun" "easy" project. I'm pretty sure we both disagree with that statement now, though.

We had gone back and forth about which tiles to use, which design to do, which color grout to use, and several other points. We finally decided upon antique white grout with 3"x6" subway style tile (Color: Urban Putty) with two horizontal bands of mosaic glass tile (Color: Cloudy Sky.) Below the first band of glass mosaic would be glossy tile and above would all be matte tile.

We started tiling around 4pm on Saturday.
We masked off the tub with rosin paper, nailed guides to the wall and drew the outline of the pattern on the RedGard.

We took a break at midnight to sleep, after eight good hours of tiling. We started again at 8:30am on Sunday.
You can see progress being made.

It was pretty tiring work, but we persevered.

Progress!

Below is a close-up of the glass mosaic tile. There is an eight inch high band near the bottom of the tub and a four inch band near the top of the shower.

Almost ready for the top band of glass! You can see that the tub is now covered with a sheet of plywood and more rosin paper to protect it. I'm not quite tall enough to tile our very tall shower enclosure. Jesse was going to be on his own after about five feet so he designed this lovely work-around.

At this point, we'd been working for twelve hours and I gave up and went to make dinner. Jesse tried to finish so he could grout in the morning but just lost steam, understandably.

He was on his own Monday (and had a lot of other things going on) but he managed to get all the tiling done, save the bottom strip. He did a beautiful job in the alcove.


All the spaces will be filled in with grout (or caulk along the seams) then sealed. Once we get it sealed, we can use the shower again! It's bath time tonight, though.

Friday, July 9, 2010

TEABAG and BEACH in the bathroom!

Before we get started: BIG HAPPY BIRTHDAYS to:
PATTY
(Jesse's mom)
and
RANDY
(Corinne's brother-in-law)

WOOOOOOOOO!!! We love you!!!!!!!!

Now back to the blog:
Bathrooms are important, and we'll get to ours, but first check out the new building across the canyon! It's a lot prettier than what used to be here.
Hopefully our neighbors don't think we're creepy for taking pictures of their backyard areas, but check out this deck two houses down from us! We're in love.

And our neighbor has a really cute back yard area with a terrace down in the canyon a bit and some beautiful trees. One day we hope to have a pretty backyard worthy of our neighbors snapping creepy photos of.

Back to our house! We've been without a porch light since before the last inspection. In order to mount the new one, we had to install our porch ceiling, though. We decided to use painted bead-board type material (actually 4" on center siding.) Below, you can see Jesse checking he fit of the cut panel. We then took it back out and primed and painted it.

You can see it installed (as well as our new porch light) below. The rest of the exterior will be beautiful soon enough...(well, not soon enough but soon.)

Back to the bathroom!
Jesse taped and mudded the bathroom and floated out the walls in a skip-trowel pattern.

We then worked last weekend on cutting out the pre-finished plywood for the vanity.
Jesse had to edge-band the pre-finished plywood so it would look uniform once our cabinet doors and drawer fronts are mounted. Below, you can see the 2x8 piece of veneer (the larger stuff [4x8] is better quality and looks better but this is just for edge-banding...) along with some tools of the trade.

After all the pieces are cut out, he mounts them with wood glue and an iron with a special technique. Both surfaces are coated with a thick coat of wood glue and allowed to dry. Then the pieces are put together and a hot iron is applied to make the dried glue melt and stick to itself. Then PRESTO -- perfectly mounted edge-banding.

Now that the pieces are edge-banded, they're marked and assembled.

The middle section of the vanity, an 18" wide drawer bank, is seen below with fixed shelves for under the sinks on either side.

Jesse then assembled the end drawer banks, 12" wide each, as well as the bottom and the long top stretchers.

Here it is (mostly) put together. All told, it's six and a half feet wide. There will be a ceiling height, 18" wide tall cabinet to the right of the vanity. The whole assembly will span one wall of the bathroom.

Here you can see the painted walls (TEABAG), the vanity skeleton, the BEACH counter top (with two under-mount sinks), two Kohler Archer faucets (that had to be shipped to NY then came out with my dad in May due to California laws prohibiting them) and the wonderful plumbing job that Jesse did.

Jesse also installed the light fixtures. We have two vanity lights and two recessed lights with shower trim -- one above the shower and one above the toilet area. The empty space with the painted heart is the right-hand medicine cabinet cavity. It should give you a way to orient yourself with the pictures.

Both vanity lights and cabinet cavities can be seen below. Jesse is building the medicine cabinets himself and will be framing mirrors with the rosewood veneer as the doors to the medicine cabinets.

Here's a close-up of a sink and faucet combo. It's a great picture of the paint color and counter top color as well.

I tried to get a close-up of the counter top. It didn't come out great so you'll all just have to come see it in person!

Here we have the Kohler Archer toilet and its enclosure. Our recessed toilet paper holder is once again installed, but it was after this picture was taken.

Still left to do in the bathroom: install travertine floor, install shower tile, install backsplash, build tall cabinet, cut and finish doors/drawer fronts, install doors/drawer fronts, install toekick face, and build medicine cabinets. No problem!!


This last picture is currently in the running to win the prize of BEST WEDDING RSVP. It was sent by Kevin, one of Jesse's groomsmen. I highly recommend enlarging the picture. It's pretty great. And Kevin, you rock.

Sunday, July 4, 2010

Independence Day in Captivity

If you're a follower of our blog, you know that last fourth of July, we were finishing up laying our travertine floor in the kitchen as we heard the fireworks off in the distance. For a few days, I thought we might have a repeat of that -- we recently decided to use leftover travertine in our bathroom and were just about ready to lay it. Alas, everything else took a bit longer that we thought and we are not quite ready to lay the tile.

Before I get in to the renovation pictures, I'll give you an update on our house mascot, Cheeba. She sure is loving the dust and mess. She gets to be "explorer kitty" every day. She's in and out of boxes, traipsing along on the plastic dust covers, and finding the oddest spots possible to take a nap. I caught her the other day resting in a box with her front paws perched atop and around the box:

And here she is stalking something or other on the plastic dust covers:

Back to the renovation. As we talked about in the last post, we went up to Frost Hardwoods to order the veneer and plywood for our bathroom vanity. Once our order was in, we had to get it back to the house somehow. Jesse's truck is out of commission and my car is just to little to handle sheets of plywood so we did what we've been doing a lot of lately: rent the Home Depot truck. Here is the truck, loaded up with supplies, in front of our house. I wonder if our neighbors think we work for Home Depot...?

We couldn't resist snipping off some of the veneer we intend to use as edge-banding and applying some finish to see what our vanity is going to look like. It was love at first sight.

As I said in the last post, we made some last-minute bathroom design changes, and we're both very pleased with the changes we made. We had ceramic floor tile, but we decided to use leftover travertine from the kitchen (we had to supplement it with ten more square feet from the stone yard, though.) We also had ceramic shower tile that we decided to replace with different ceramic tile (we special ordered that so no pictures yet.) We also switched out the glass tile backsplash/accent to something with a little more coolness to it. Lastly we made a decision to go from yellow to a green-brown paint. Jesse uncharacteristically let me run to Home Depot today to choose and buy the paint --- without purchasing a tester! He was very happy with my choice.

Below is travertine floor tile, the glass tile backsplash/shower accent, the paint swatch, and the finished piece of vanity veneer. We think it all pulls together very nicely -- hopefully the special order tile works as well!

Saturday was odds-n-ends day. We got a late start, Jesse worked on the living room electrical, and I ran errands. When I got home, Jesse put me to work finishing up wiring some outlets in the living room.


A few weeks ago, we posted pictures of the vanity plumbing. Here it is all covered up and ready to be taped and mudded.

Our next step was to embed the backerboard into a mortar bed and screw it down to the floor. It was pretty time intensive and we had to remove the toilet for nearly a whole day. The screws need to be in an eight inch square pattern, which adds up quickly. Here's Jesse taking a quick break from the floor to 'hot mud' large spaces in the drywall.

Jesse puts the last piece in, below. My job was to screw it all down. We then worked together to tape up the seams and called it a night (around 12:30am.) We wanted to keep going and get some tape and mud on the drywall but we were beat.

We went nearly a day without a toilet. I'll spare you the details, though. Here it is right after we took it out and put the backerboard down:


And here it is once we put it back in today! We're going to have to remove it two more times: to paint and to lay the travertine, but those should both be quick.

This is Jesse working with the second coat of joint compound on the bathroom drywall.


Today (7/4) we also made the toekicks for the vanity and tall cabinet, cleaned up the back yard (which was more of a feat than it sounds) and made an Independence Day dinner for our friends Jenny and Pat. I forgot to get food or friend pictures, but here's a shot of the make-shift table we had to use. Our dining room is currently a vanity counter top storage area and our table is in a room that now has too small of a door to take it out in one piece. So we kludged together a table.
In the spirit of John Hancock, we made corn on the cob, salad and skirt steak with a cilantro garlic sauce. We toasted another year of independence with an India Pale Ale from Coronado Brewing Co.
Time to get back to work!

Thursday, July 1, 2010

The Hunt for RedGard-tober

Alternate post titles include:
Little RedGarding Hood
RedGard Dawn
The Redygard


Catching up may be hard to do (or is that something else...), but we're going to give it our best! The good news is that we now have a bathtub -- AND it fills with water. The better news is that we have a toilet -- that flushes! No more will you hear this in our house, "Jesse, could you go outside and get me a bucket of water please!!?!?" Oh no.

Life is good.

Things were getting dicey around here after a month of showering at other peoples' houses. It's difficult to adjust every day from living in the "third world" to a professional office setting. But we made it! Thanks, in large part, to Tanner and Jesse. Also thanks to our wonderful home inspector. Ever since meeting my dad she seems to have softened up toward us -- must be that western NY charm.

Anywho, on to the pictures!

The photo below is the mess of wires that we pulled in the garage. Somehow these would all need to fit nicely into that big box over there to the left...

Who better for that job than Tanner? That's what we thought, too.

Here's a view inside the box (the panel opens from the outside. SO...if a scary person wants to cut power to my house on a dark and rainy night, they just have to go lift up the door on the panel???????? That's how it's done here in California. Thank goodness we don't have many rainy nights.) By the way, yes, these are wired backwards -- as Jesse found out after receiving a shocking message. Tanner came back and fixed them :)

And the finished product! Pretty amazing, right?
PS: If you want to know about the line of junction boxes, as Jesse.

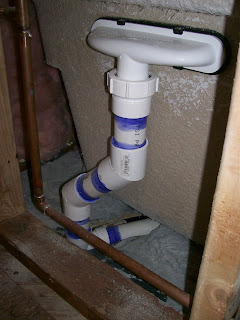
Speaking of Jesse, here he is! Properly installed, the bathtub sits in a bed of mortar. (Our old bathtub was affixed with two ratty looking screws -- no mortar in sight.) Jesse is shoveling the mortar into the bathtub bed.

Our tub is a deep-soak tub -- it has this special drain to make it so. It's pretty amazing, as I can now attest, having taken several baths in it.

And here is the intalled tub. I actually took a bath in it that very night -- bare studs and insulation and all!

A few days later, we installed the backerboard (we'll be tiling the enclosure.) Instead of a hanging shower caddy, we'll have a little alcove with shelves for our bath products.

Here's a close-up of the alcove -- where Jesse put fiberglass tape to strengthen the corners.

And here it is after a layer of thinset mortar.

This is a wide view of the thinsetted backerboard.

Jesse had to remove the backs of some screws with his Dremel, which he had fun taking pictures of.

Our house doesn't have insulation in the walls, so everywhere we're opening up a wall, we're stuffing it with insulation. Jesse was surprised by the picture-taker and shot first.

And here is what our Blog Post is named for: RedGard. It's a paint-on waterproof membrane that goes over backerboard and under the tile. It's pretty amazing stuff -- better than the plastic membranes people use under the backerboard. Jesse likes it so much, he took a series of photos of the application. Can you guess how he applied it? (answer below)


Were you able to guess how he applied it? He tried first with a notched trowel, but didn't like it, then he tried a paintbrush, but didn't like that either. He ended up using a technique the my nephews are very familiar with -- fingerpainting!


Our second bedroom closet now extends into the uninsulated garage -- so it is essentially an exterior wall. Here are some photos of the insulation.


A lot of other things have happened:
We passed our electrical meter inspection (after a few minor fixes)
We passed our rough framing, electrical and plumbing inspection (my dad was very relieved -- though we did have a few fixes to make)
Corinne ripped out the four inch piece of wood at the bottom of the wall in the living room (with a circular saw!), drilled all the holes for new wire, and pulled all the new wires! Tanner helped me with cut-in boxes, though. This was done all over the house, but I'm excited because I did the majority of the work for this part...
We passed our insulation inspection (today!)
We decided to go in a different direction with the shower tile -- and ordered all of that from Home Depot (I'll post pictures when it comes in -- we should be tiling in less than a week)
We ordered our veneer for the bathroom vanity and tall cabinet. We went up to Frost Hardwoods and spent a little while perusing their samples and settled on Santos Rosewood. We'll go pick up our pressed panels tomorrow and we might even build the vanity this weekend!

Here's a look at what Santos Rosewood looks like:

We've still got a LOT to do, but we're really making progress. We leave for the wedding in three and a half weeks -- we'll see how far we get!!!