Tuesday, June 30, 2009

Epic Fail!

So, we checked and found out that the floor was badly out of flat and level. After a lot of reading on the internet we decided that the best way to bring the floor up to flat was with self levelling compound, a cement like product which, ideally, goes on really thin and flows out like water before hardening.


The floor needs to be cleaned and painted with a special primer/sealer before the compound goes down. It's mostly clear, as seen here. See? I do my homework!

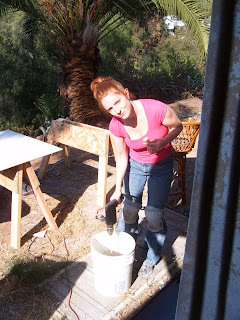
Five 50 pound bags of self levelling compound, and the garbage can I am about to mix it in. It was hot today, but that should be ok, right?


I read some horror stories about people having their wimpy duct-tape dams fail and flood their rooms, so I made nice, strong 1X2 dams, and even caulked them into place to ensure a leak free pour. I really thought I had done everything right. I read the package and the manufacturer's website and got the instructions and followed them exactly. I measured the water carefully and mixed the product as thoroughly as I could. I watched the clock and stopped mixing and poured exactly when I was supposed to, but it just didn't work. Instead of flowing out to fill the low spots in the floor as expected the mix just sat in in a big pile. It was hot, too. The material was very warm to the touch, evidence of the rapid chemical reactions taking place. I could tell that it was getting harder and hadn't flattened out much at all. I made the decision, too late maybe, to flatten it myself. I grabbed a trowel and a 2X2 and set about trying to flatten the product and the few lumps I hadn't mixed well enough, but time had run out. It went from pea soup to mayonnaise to peanut butter to concrete in about 5 minutes. According to the bag it should be walkable in about 2 hours... mine was walkable in less than 10 minutes. Now, I have a huge, uneven, footprinty and way too thick slab of concrete in the middle of our newly backerboarded floor. Epic Fail!!


My plan in action. I figured out how high I want the floor to be and cut a recess in the cement to that height with a cold chisel and a hammer. I could then use this reference height, along with little wood blocks and a level, to create other recesses, all in plane with each other. Once the floor is sufficiently referenced, I can use a diamond blade in an angle grinder to cut a grid of kerfs, all the proper depth, into the surface of the compound and then I can chisel out the remaining squares. We'll see. Something has to happen. Worse comes to worst we can rent a chipping hammer and take all of the cement up off of the backerboard, but hopefully it wont come to that.

Toekick Sunday!

Now we're cooking!

Sunday we constructed the toekicks. For those of you who are unsure, a toekick is what each of the base cabinets sit on and where your toes go. It puts a recess at the bottom of each of the cabinets and lets you get close to the counter top without losing your balance.

Jesse asked to set up shop in the kitchen - because it was hot as H-E-double hockey sticks in the garage and outside.


First, Jesse used a little computer program he made to produce a cut list. Then he cut up the plywood and labeled each piece with the part of each kick it was going to make.


I told you it was hot!


The finished products! He let me make two cuts and put one box together. But, it goes a lot faster when he does it and he was eager to get me out of his way...


YAY!
Here they are laid out like they will be once we install the cabinets! We played house and imagined what it would be like to be in there once it's all finished.
I can hardly wait!


Sunday, June 28, 2009

Saturday Funday

Not nearly as fun as Sunday Funday...

Back before we closed escrow, the Big Orange Box's sophisticated older sister, EXPO Design Center, was going out of business and liquidating all of its stock. As many of you know, before we knew whether or not we'd get the house, we went to EXPO and spent a ridiculous amount of money on items that were reduced by 50-70%. We got some amazing deals on a whole bunch of stuff including a kitchen sink, kitchen faucet, bathroom faucet, bathroom hardware, ceramic tiles for bathroom, and enough travertine for our (hopefully) soon to be kitchen.

Our mortgage consultant and real estate agent nearly had our heads.

BUT it all worked out! And now we're preparing for the installation of all that beautiful travertine.

Now, what you've all been waiting for, our Saturday in pictures!

First, we had to rip up all of the old linoleum and other strange flooring. Jesse made a grid of cuts down to the sub-floor that you see in this first picture. Our house was built before plywood so our subfloor is made of diagonal 1x6 planks across the floor joists. You can see right down into the crawlspace. It was grueling work, prying up all of the linoleum (and attached plywood.) It was loud and quite dusty as well, so I am wearing ear and eye protection.

Here you can see the exposed subfloor with the patch Jesse made where the old water lines used to come out and into the kitchen.
Corinne working and Jesse cleaning? Are we in bizarro world?
The exposed subfloor view of the kitchen (refer to "eyes on the prize" picture from two posts ago for a reference.) Just to ensure non-squeakyness, we went through and screwed down each plank where it crossed a stud. I found from this experience that I'm not very good at repetititve driving of screws. Jesse even bought a new phillips head bit just for me...to destroy.
We then measured and cut the backer board and laid it down using 16-penny nails as spacers.
Time to mix up the thin-set mortar...and to finish a sundae cone.
Our thin-set mortar is actually quite thick. The guy at the Big Orange Box told Jesse we should just buy the pre-made stuff...but it cost $30 more for the same amount!! We're reasonably intelligent people, we can mix our own...right? Well, maybe Jesse could. When I mixed the second batch, I put twice the amount of required water...
After laying the mortar and backerboard, you have to screw it down with special fancy screws in an 8" grid. That's over 500 screws! After a thorough vacuuming, we taped and filled the seams and went to bed. Phew!


For your viewing pleasure.
In my defense, I thought he was just taking pictures. I just realized as I was selecting pictures for the blog that he took a video of me. I would have been much more on-point if I'd known it was a video...
Here I am tearing up the last bit of linoleum and removing gobs of caulking from between the floor and the wall. I swear whoever caulked it just had a ton of caulk that needed to get used up so they figured they'd just squeeze it all into any space they could find.

Saturday, June 27, 2009

Addition

The apple of my eye.

I just remembered that I hadn't included a picture of it in the last post.
We had about nine loads to do the first day we hooked it up. Never again will laundry build up like that.
I love this little guy.


We got a great deal on it. We found it on Craigslist and bought it from a guy who sold his townhouse and needed to get rid of it. It's like new and cost us less than half of what its listed for at the Big Orange Box.
Jesse hooked it up while I was up in LA a few weeks ago for my friend's bridal shower.
I was a very happy girl when I came home.

Molassas Station

It may seem as though we're moving pretty slowly lately - but I can assure you that Jesse has been working his little bottom off with ten hour plus days and no rest for the weekends.

He talked about our little indoor plumbing fiasco a bit in the last blog - who needs a main water line anyway?
Well, to give you an idea of the rusted-out-ness that we were dealing with, here's the sink aerator from our bathroom.
This is after we had replaced ALL the pipes in the house with the exception of the runs from the crawlspace to the bathroom (maybe five feet of old pipes left at the most.) So this buildup is from FIVE FEET of yucky old pipes that all of the sudden had a TON of water running to them because of the un-blocked-ness of the new pipes that fed them.

Five feet and actual water pressure created this:
Yuck.

So as I was saying, Jesse worked his bottom off for about two weeks replacing all of our indoor plumbing and running new lines to our WASHER/DRYER and the new kitchen. Yes, folks, we have a WASHER DRYER!
Oops - I forgot to take a picture of it.

Later. During that week and a half of working in the tiny crawlspace beneath the house with the spiders, Jesse developed a nasty upper respiratory infection and was coughing up golf ball sized hunks of yuckiness into his breathing mask - AND STILL WORKING NON-STOP.
I tried to get him to take a day off, but he didn't think that was an option considering we didn't have indoor plumbing.

I know how to pick 'em.

Plumbing finished, we (and by we I mean Jesse) moved on to the electrical. Here's one of our junction boxes. Looking at it now, I'm re-thinking having a professional electrition come in...
He did a great job, though. And we'll be having a city inspector come in to verify this for safety!

Most people put baseboard over the existing wall. Not whoever built our house! When we took the baseboard off to run electic for new outlets, we found that it just butted up against the bottom of the drywall...

Most homes today have at minimum a 200 amp service. Here's our 60 amp service with its four (yes, four) circuits. Ha.

Here's a nice picture of our kitchen looking into the living room. This is where the sink, eating bar area, and two lazy susans will be.

Here's the fantastic framing and electrical job Jesse did on the part of our kitchen that will house our oven, OTR microwave and refridgerator.

Check out our sweet new paddle switches. I was against them at first but Jesse convinced me. You may need to tip your monitor over to view them properly.
Below you can see (from left to right) our living room (three-way) light paddle, the living room fan control, and our dimmable pendant lights that will go over the bar eating area paddle!
I've somehow convinced Jesse to grow a renovation mustache.

Cheeba is still doing quite well through the whole process and Jesse has managed to not let her out into the wilderness or hit her with a tool! In fact, he's become quite fond of her.

Our second bedroom has morphed into an office/storage area/cheeba bathroom. I believe the boxes are full of kitchen supplies so we should be ready for guests again in August. Speaking of being ready, we created a revised calendar of kitchen renovations, which we posted on the wall there in the left of the picture. The whole "re-plumbing the enitre house" thing got us a bit off track. We now expect to be done done done by July 31st - including a trip back east to NY in July of time off.

Keep your eyes on the prize.
Here's the kitchen looking at it from the dining room. We haven't settled on colors for anything. We know we're going to have shaker style doors for the cabinets (not whatever these are) and that's about it. The countertop, backspash and paint colors are still all up in the air.
So vote now!


Lastly, this is what happens when Jesse works twelve-hour days...

Tuesday, June 9, 2009

manifest destiny


just a reminder what the old kitchen looked like, and why we're going through all this trouble. Simply unacceptable.


Here we see the old framing for the second bedroom closet. Push your monitor over for proper viewing. A new wall had to be built to carry the load from the ceiling and roof before this could be removed, and the ceiling joists had to be extended to reach it.


Here I am cutting into the ceiling. I was able to remove some but not all of the insulation up there, so in about 2 seconds it will be pouring down on my face. Hence the full on goggles and mask.


The wall where the kitchen cabinets were. I think this is actually a strangely beautiful photograph, and will end up framed in the finished house. Photo credits go to Tanner.


No more wall! Cleaning all this up was kind of a pain, and generated a lot of waste. Some of the studs were salvaged and reused, but the vast majority is now helping to fill up the Miramar Landfill.


The new kitchen in progress. Huge holes still gape in the wall and ceiling, but things feel like they're coming together. In the back you can see the new plumbing for the kitchen sink. Its going to be all copper, because for some reason California still has not hopped on the PEX bandwagon. Maybe it has something to do with the fact that chemicals which are widely known the world over to be perfectly safe cause cancer here.


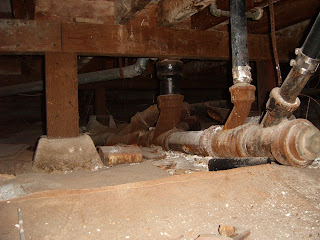
This is where I get to hang out tomorrow. Most of the hot and cold supply is getting replaced, with the exception of fixtures which will later be moved. A few new places need to tie into the old cast iron waste pipes too. I love the smell of 60 year old poo.